6 quick and easy ways to arrange Tulips

Tulips are easy to find in the shops, affordable, come in every colour and suit a wide range of designs.  Follow the links for more ideas, and step by step instructions on how to quickly create a beautiful tulip design to suit your home, from cool simplicity to a riot of movement and colour.

  1. Tulips in a bowltulipglobe
  2. Tulips CubeIMG_0102
  3. Hand tie in a globe vasetulipvase
  4. Mix with other Spring flowersimg_5503
  5. Tulips inside Cylinder Vase tulipcylinder
  6. Tulips and bark, vase inside a vase img_5496

Tulips inside a bowl

tulipglobeThis is a very simple, but eye catching contemporary design, all you need are some tulips and a fish bowl vase the grass is optional.  The purple version below is in a smaller vase so only used one bunch of tulips.  You can also add pussy willow to complement the tulips.  The glass magnifies the tulips, drawing your eye to the beauty of these Spring flowers.

IMG_0092

How to create

Make sure your fishbowl vase is clean.

If your tulips have been in water leave them out of the water for 1/2 hour so the stems are more flexible

If you are using pussy willow or bear grass, cut off the thicker ends leaving the more flexible stems and curl this into the vase first.

Remove any bulky or damaged leaves from the tulips.  Cut to a length that will allow you to curl into the vase.  Then add your tulips one by one, making sure the stems are towards the bottom.

Turn the vase slightly each time so the flowers are spaced around the vase, vary the heights of the flowers – it looks good if one or two poke out above the rim of the vase.

Dilute your flower food in cold water and pour into the vase, make sure all the stems are in water.


A Touch of the Exotic grown in the UK

IMG_5403I went to the market to buy my weekly flowers with an image in my head of late Summer English bunches of daisy type flowers which I was planning to make a natural loose round design for the centre of the table.  Instead when I went to the stall which sells flowers grown in Bedfordshire I couldn’t resist these hot pink flowers with their contrasting glossy dark stems.  As they had a tropical look to them I added a bunch of Alstroemeria in a dusky pink with a lime centre.  I found out the pink flower is an outdoor variety of Amaryllis or Belladonna lily.

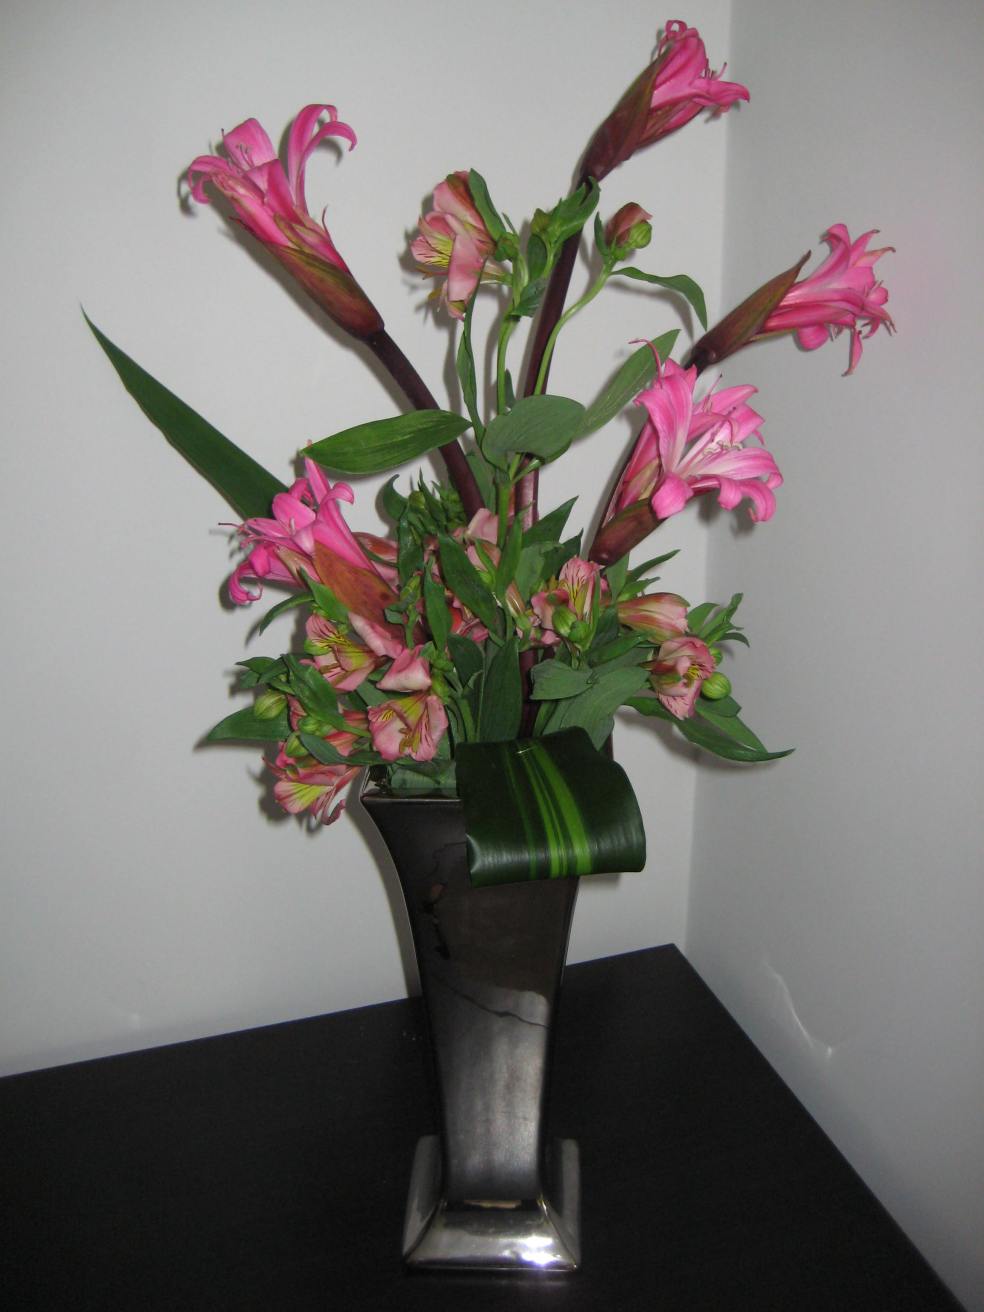
I wanted to show of the beautiful stems of these flowers as well as leave space around the strong flowers so created a linear hand-tie which I then added more flowers and foliage to around the base of the design.  The design sits in a tall tapered silver vase.  The Amaryllis are an unusual flower I hadn’t seen before but you could use any flower with a strong form instead, good alternatives at this time of year would be Anthuriums, Agapanthus, Callas, or Gerberas.

How to Create

I removed all the lower leaves from the Alstroemeria, simply run you hand from just below the top set of leaves down to the bottom of the stem.  Cut a length of string ready.  Then in one hand create your design, start with the smallest flower at the top, then stagger the flowers with the biggest bloom at the base, I interspersed the Amaryllis with a stem of Alstro, with another at the base.  It doesn’t matter if you need a few attempts before you are happy and you can slightly reposition/turn the flowers even when tied.  I then tied my string around the stems below the bottom flower to hold the stems in place.

I held the flowers against my vase to judge where to cut the stems, if possible cut the each stem diagonally to improve water uptake.  I wanted to finish the design with some foliage with a tropical look, so I removed a Dracena and Yucca leaf from my houseplants!  Houseplants are a great source for a glossy tropical leaf another very useful plant is the Aspidistra, just don’t pick too many!  I rolled the Dracena leaf and created a pin with some wire (you could use any garden wire if you don’t have floristry wire or even staple in place).  I fed this stem into the string at the front of the design and put the Yucca leaf into the back.

When I put my flowers in the vase there were some gaps at the top of the vase, I put in some more Alstro cut to sit just above the top of the vase.  I diluted some flower food and poured into the vase.


Blooms Inside the Vase

IMG_5399

As Gladioli are still cheap and easily available I bought them again this week, but wanted to do something different with them.  Instead of arranging them so the focus is above the top of the vase, I made the vase itself part of the design, by having some of the blooms inside the vase with extra interest of mini shells and pebbles.  By arranging flowers inside a vase – the vase acts as a magnifying glass forcing your eye to focus on the individual blooms.  I chose soft colours of peach and green that would suit the colours of my pebbles and shells but of course you could make this more dramatic with strong purple and red gladioli and darker pebbles.  Any stones, gravels, glass can be used in the vase, but make sure they are clean.  I loved the feel of looking into a cool pool on a hot summers day.

IMG_5402

How to create

I chose a vase that would be wide enough for my gladioli, leaving space for the flowers to open.  I started with a layer of pebbles in the bottoms of the vase.  I cut the gladioli a couple of inches below the bottom flower and pushed each stem into the pebbles, turning each stem so the bottom blooms could be seen through the glass.  The stems maybe still fall over a bit at this stage, but don’t worry.  Once all your flowers are in add more pebbles or in my case the shells.  If some stems needed more support, I dropped in more pebbles around their base while holding them upright.  I then mixed the flower food with a litre of water and poured into just below the bottom blooms.

Seaside Roses

roseshell

A simple modern design of soft peach roses in a cube vase complemented by seashells for a summery feel.  This would also work with white or cream roses, or other colours could be accessorized with glass cubes/marbles, pebbles.  If you were having a party this design could be repeated in sets of 3 or 5 to create a lovely table centrepiece surrounded by nightlights.

“I’d rather have roses on my table than diamonds on my neck.”

Emma Goldman – well maybe both would be good!

How to Create

I used a glass cube about 12cm square, which I filled about halfway with mixed shells.  Dilute your flower food and pour into the vase.  I then created a grid using narrow sellotape across the top of the vase.  You will need to create gaps for 9 roses, so 2 lengths of sellotape in each direction.  Try not to bring the sellotape too far down sides of the vase that way it won’t be visible.  I selected the 9 best roses from my bunch, and cut the stems so they would fit above the shells, remove all remaining leaves.  I then slotted each rose into the grid, as more roses are added they support each other.   Make sure the water reaches the rose stems and top up a little if needed.